Tuesday, April 12, 2011

Embroider with Sequins and Beads


The Bunch of Flowers and Leaves repeated
With little letting your mind run wild you can create wonders with your hands which can be worn by you and be praised by others.

This Embroidery is worked on a Silk Salwar Tops. It is worked with Sequins, Tube beads, Seed beads, Bronze Metallic Thread and Orange Embroidery Floss.


The Motif is repeated 4 times at the end of the Salwar tops and the Neck is worked by repeating a bunch of three flowers and leaf.The same neck motif is repeated in the sleeves of the hand also

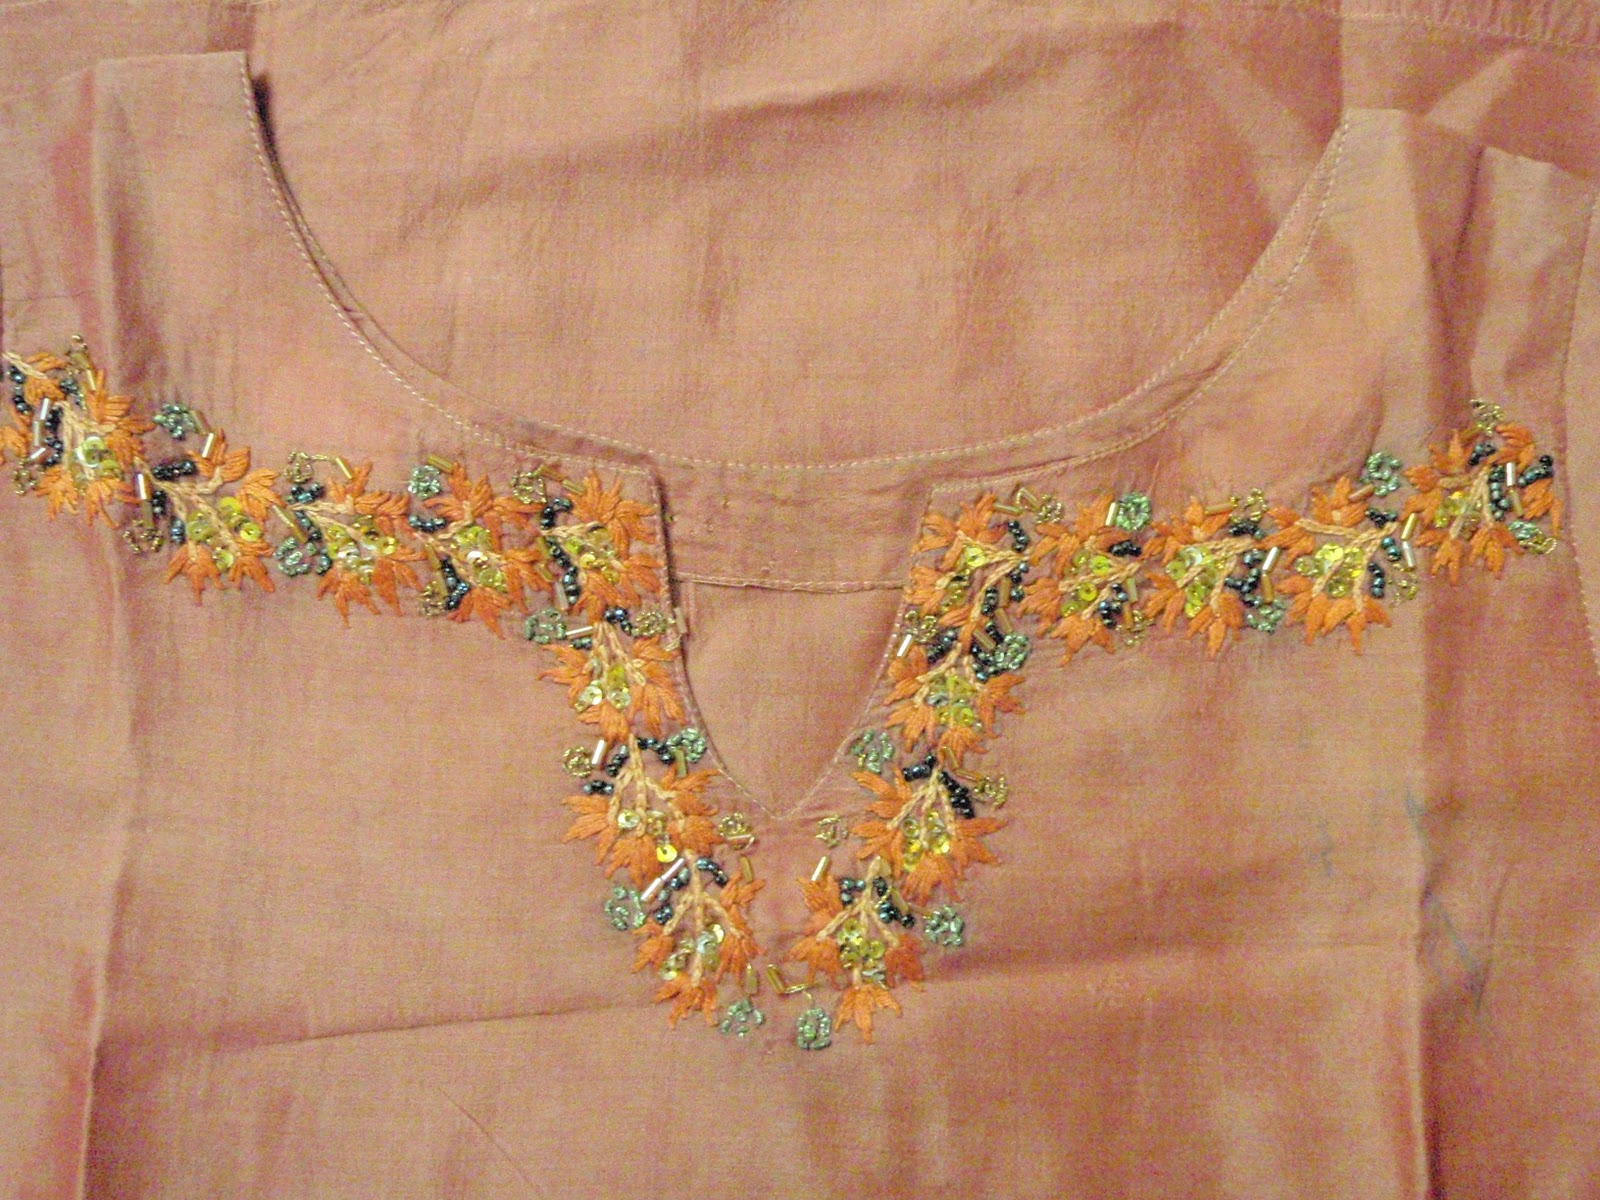
The Flowers are worked in Three Stands of Orange Embroidery Floss in Satin Stitch The Stem is worked in Chain Stitch alternating with Tube Beads with  Two Strands of Bronze Metallic Thread. The Leaves are worked in bronze Sequins and the buds are worked in French Knots using Bronze Metallic Thread.The Vines are worked with Black Colour - Contrast Seed Beads to make them stand out.


The Main Motif Is Repeated 4 Times to form a Border

Saturday, March 12, 2011

Embroider with Stones

Chain Stitch worked with metallic Red and Silver and filled with Stones.
With my Kid active and Kicking inside my womb I was thinking how to make use of the precious time at hand. I had just finished a Cross Stitch Wall Art and my Mom suggested why not do some Embroidery on Salwar Tops and got me 4 different colours. My Mother-in-law did the positioning for the neck and all, but the design eluded us.

That was when I came across a diamond pendant advertisement in a magazine. Why not use this and make a pattern on the Salwar tops. So I had the design resized to suit the salwar - 4 at the lower portion and one near the V-shaped neck.

I choose White and Red stones to represent the Diamonds and Rubies in the design. I worked the Platinum portion in Chain Stitch with Metallic Silver and Metallic Red. It took almost 2 months to complete it and before I finished this my Bundle of Joy was born. So one can use our imagination to make use of any design /pattern creatively.

Thursday, February 24, 2011

Jacobian Couching


Jacobian Couching and Back Stich as filling


My Parents house is a haven for studies, crafts and sports. My Mom, a pedriatician, in her spare time designs and embroiders sarees and Kurthas for us.

This design I had picked it up from a design book "Needle N Thread" and worked on with only 2 solid colours Yellow and Black in a Blue Cotton Fabric.


Jacobian Couchin done wit contrasting colours Yellow & Black


The Motif comes from the chest down and is worked in Chain stitch and Stem Stitch Filling. The Space framed by the Chain and Stem Stitch is worked with Jacobian Couching and Back Stitch.


For  Tutorials on Jacobian Couching

Tuesday, February 22, 2011

Simple Beading on Dresses

The Flower beads are sewed into the fabric to form a elegant pattern


This is a Dress made for my Daughter by her Aunt. It was a Navy Blue Plain dress. I choose some flower shaped beads and formed a simple pattern on the dress. I glued it using fabric glue and then sewed them on to the fabric. Voila the palin dress is now elegant.

Thursday, January 20, 2011

Green Ribbon Bracelet

Beautiful Bead Braclet can be done in any combination


This sequence creates a chain with Double Diamonds between even loops. Can be made into a BELT.. BRACELET... or a CHOKER. This design is from the book "Getting Started with Seed Beads by Dustin Wedekind". This book has some wonderful designs which can be worked in an afternoon. I had not used the beads specified in this book even then it turned out quite impressive and my Daughter helped me a lot by just picking up the beads for me.

Materials:


  • Size 8 Brass(A) and Blue(B) seed Beads - I have used a smaller size brass bead and Green Crystal.
  • Size 11 Blue Green Beads(C) and Green (D) Beads.
  • Size 15 Brass(F) seed bead.
  • Beading needle and Thread.

  1. Using 6' of thread to string 1A, 5C,1B,5C,1B,5C and 1A, leaving a 4" tail. String 7,1A,5C: pass back through the last 1B. String 5C, 1B,and 3C; pass back through the first 1A and tie a Knot with the tail thread.
  2. Bottom Loop : String 7D, 1A, and 5C; pass back through the last 1B. String 5C, 1B, and 5C; pass it back through the top 1A.
  3. Top Loop: String 7D, 1A, and 5 C; pass back through the last 1B. String 5 C, 1B and 5C; pass it back through he bottom 1A.
  4. Continue working Top and Bottom Loops for the desired Length.
  5. To reinforce the edges straighten the ribbon, pass back through 7D string 1E and then pass back through the next 7D.

I made it into a bracelet by working on the same and inserting it through the first diamonds